
Installing Voila on PYNQ Version 2.6
Interactive and engaging dashboards can be used to control and introspect complicated embedded system designs. Many PYNQ demonstration repositories developed by strath-sdr have associated applications that are implemented using Voila-Dashboards.
Voila allows the developer to create standalone web applications using a Jupyter Notebook. When combined with PYNQ, the developer’s Zynq platform hosts the web application directly on the chip, removing the need for other server components.
Here are several links to several interesting Voila-Dashboards, designed around Radio Frequency System on Chip (RFSoC) platforms and PYNQ.
All of these examples leverage Voila for web application deployment. However, installing Voila on PYNQ requires a few steps. This short blog describes how to install Voila correctly on PYNQ v2.6.
The Packaging Problem
If you explore the Voila GitHub repository, you may believe that installing Voila is fairly trivial. The installation procedure asks the user to open a terminal and install Voila through pypi (the Python Package Index). However, installing Voila without considering other packages and dependencies in the PYNQ environment will cause many of them to become incompatible.
When installing Voila on PYNQ v2.6, we should be very careful to install particular versions of system packages, and prevent the Python Package Manager, pip, from forcefully upgrading certain packages.
Additionally, we must also uninstall pyzmq and terminado using the operating system’s package manager (apt) and reinstall these packages using the Python Package Manager (pip). This will allow these packages to be upgraded correctly when the time comes to install Voila on PYNQ v2.6.
The Pre-Installation Procedure
If you would like to use Voila with PYNQ v2.6, you will need to follow the installation instructions given below. It is important to note that Voila is not essential and many of the strath-sdr demonstration projects highlighted above still operate effectively without Voila-Dashboards.
-
Begin by obtaining a fresh PYNQ v2.6 install from here.
-
Download the image for your development board and write it to an SD Card.
-
Insert the SD Card into your development board and power it on.
-
Navigate to Jupyter Labs by opening a browser (preferably Chrome) and connecting to
http://<board_ip_address>:9090/lab. -
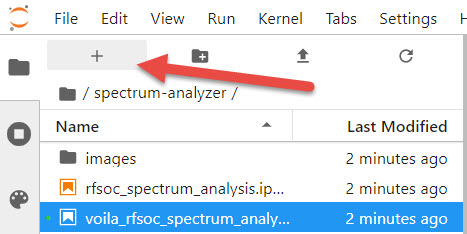
We need to open a terminal in Jupyter Lab. Firstly, open a launcher window as shown in the Figure below:
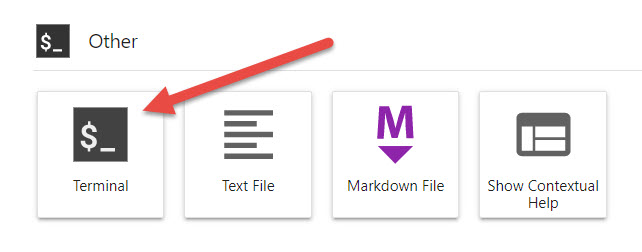
- Now open a terminal in Jupyter as illustrated below:
The Actual-Installation Procedure
Now that we have our terminal open, the first thing we would like to do is uninstall the pyzmq and terminado packages from the system using apt.
apt remove -y python3-terminado
apt remove -y python3-zmq
Executing the above code cell in the terminal will uninstall the two packages. This may take a minute.
Now we should reinstall many of the packages that were uninstalled as a result of removing pyzmq and terminado from the system. We should install all of these packages using one command to ensure that the correct packages are retrieved.
pip3 install terminado==0.8.1 pyzmq==17 notebook==5.2.2 nbconvert==5.5.0 jupyter-client==5.3.1 ipykernel==4.8.2 nbsphinx==0.3.1
This will take a while. The package that will consume the most time installing is pyzmq. Why don’t you have a look around the strath-sdr GitHub while you wait. We also have other reading material on Software Defined Radio, the Zynq SoC, and the Zynq MPSoC, which may interest you below.
Once the installation is complete, its time to install Voila. Simply run the command below in the same terminal window as before.
pip3 install voila==0.1.13
Congratualations! You have just installed Voila. We used an earlier version of Voila, as that is compatible with our PYNQ v2.6 environment. Follow on to the next section to complete the installation procedure.
The Post-Installation Procedure
After Voila installs, you should really restart the Jupyter environment. We can do this by running the code cell below in the terminal window.
systemctl restart jupyter.service
Once you run the cell above, you may receive a message saying ‘exit’ or something similar. This is just the Linux way of saying that Jupyter has terminated. As we asked it to restart, it will eventually start running again.
- Wait around 1 minute after executing the restart Jupyter command, and then refresh your web browser.
You should be able to connect to Jupyter Labs again and start using Voila. To check that Voila installed correctly, simply open a new terminal window, and enter the command:
voila --help
And thats all there is to it. We installed an earlier version of Voila and directly stated the correct version of dependencies to install. You can now use Voila on your PYNQ development platform.